I still remember the first time I ran into Miasmic Fiend - Unfathomable in Zenless Zone Zero. I thought I was ready. I had my best damage dealers, a solid rotation, and plenty of confidence. Then the boss dropped a Miasma shield, and my attacks felt like I was throwing paper balls at a wall. Have you ever watched your combo do almost nothing and wondered what you were missing? That was me. Since Version 2.1 unlocked this boss in multiple challenges, I've learned a few things the hard way, and I'm sharing them here so you can skip some of my mistakes.
How I Unlocked the Fight
Unlocking Miasmic Fiend - Unfathomable isn't a complicated quest chain. As of Version 2.1, the boss appears in different challenges, and simply encountering it in those modes unlocks its card in your database. I first ran into it through Hollow Zero's Task Force Investigation in the Lost Void, which got a major revamp in 2.1. The other main spot is the Simulated Battle Trial's Endless Tower Glory. If you're like me and you like to collect every enemy card, you'll want to clear at least one of these encounters.
-
Hollow Zero's Task Force Investigation (Lost Void) – the new and revamped mode from Version 2.1.
-
Simulated Battle Trial – Endless Tower Glory – a repeatable combat challenge.
Encounter the Miasmic Fiend - Unfathomable in either of these challenges, and its database card is yours. Simple, right? Well, the fight itself is another story.
How I Beat It: Rupture, Red Circles, and Healing
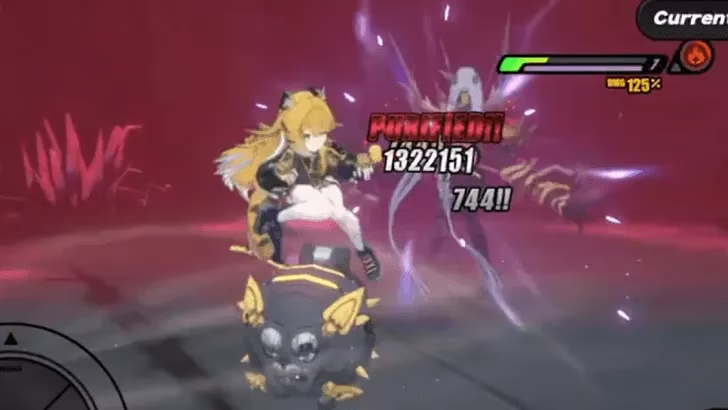
My first clear came after I stopped treating the Miasma shield like a normal HP bar. Here's the core lesson: Rupture Agents are your best friends. Much like the Miasma Priest and other Miasmic enemies, this boss relies on a Miasma shield. Rupture characters can bypass that shield and shred it efficiently. When the shield is completely destroyed, the boss gets purified, and that leads to substantial DMG and Daze. In other words, the shield isn't just a wall—it's an opportunity. Why spend minutes chipping away when you can turn the boss's own defense into a stun window?
Here's a quick table of what I prioritize in the fight:
| Priority | Tactic | Why It Matters |
|---|---|---|
| 1 | Bring Rupture Agents | Bypass and shred Miasma shields, trigger purification DMG and Daze |
| 2 | Lure red circles into Miasma Pools | Clear the battlefield and reduce environmental pressure |
| 3 | Include healers like Pan Yinhu or Astra | Negate damage from attacks and Miasma Corruption |
| 4 | Manage positioning | The red circle follows you before an overhead slam |
At a certain point in the fight, the Miasmic Fiend launches Miasma attacks that hit in an AoE. You'll see a red circle on the ground, and it follows you. Then an overhead attack slams down quickly. My instinct at first was to run away from the circle, but that's actually wrong. The smarter play is to draw the red circle on top of the Miasma Pools. Doing so clears them out and makes the battlefield less hostile. Have you ever tried to fight in a room full of hazards while also dodging a boss? It's miserable. Luring the circle onto the pools is like cleaning your own arena mid-fight.
Healing is the third pillar of my strategy. There aren't many healers in ZZZ yet, but both Pan Yinhu and Astra can heal. They help negate damage from the Fiend's attacks and from Miasma Corruption. I found it wise to have at least one of them in my party, especially because they also contribute to overall damage output. You're not sacrificing a slot for pure survival—they pull their weight.
Where I Fight It
If you want to test your team against Miasmic Fiend - Unfathomable, here are the two places I use:
-
Simulated Battle Trial – Endless Tower Glory. This is a straightforward combat challenge where you can practice the fight and learn the red-circle timing.
-
Hollow Zero – Task Force Investigation (Lost Void). As of Version 2.1, this revamped mode includes the boss. It's my preferred spot because the surrounding systems make each run feel a little different.
Both modes are accessible in the current version of the game, and I still use Endless Tower Glory as a warm-up before tackling harder Hollow Zero runs. What's your go-to training ground for new bosses? For me, repetition in a low-stakes trial beats throwing myself into a high-difficulty run blind.
Basic Information at a Glance
| Category | Details |
|---|---|
| Boss Name | Miasmic Fiend - Unfathomable |
| Enemy Type | Boss / Miasmic enemy |
| Key Mechanic | Miasma shield, bypassed by Rupture Agents |
| Purification Effect | Substantial DMG and Daze when shield is fully shredded |
| Notable Attack | Tracking red-circle AoE followed by an overhead slam |
| Recommended Counters | Rupture Agents, healers (Pan Yinhu, Astra), Miasma Pool clearing |
| Encounter Locations | Endless Tower Glory, Task Force Investigation (Lost Void) |
| Unlock Method | Encounter it in the above challenges to unlock its database card |
Related Guides I Wish I'd Read First
When I was learning this fight, I spent a lot of time looking up related systems. Here are the guides that helped me most:
-
Version 2.1 Release Date and Banners Guide – useful for understanding when the boss was added and what characters arrived alongside it.
-
List of All Rupture Characters – essential for building a shield-shredding team.
-
List of All Characters – I used this to check healer options and plan my party.
-
Endless Tower Glory Guide – covers the Simulated Battle Trial mode where the boss appears.
-
Task Force Investigation Guide – explains the revamped Hollow Zero Lost Void mode.
-
List of All Enemies – helpful for tracking database cards and comparing Miasmic enemies.
Final Thoughts
Miasmic Fiend - Unfathomable is one of those bosses that feels impossible until you understand its central gimmick. Once I started bringing Rupture Agents, luring the red circle into Miasma Pools, and keeping a healer on the team, the fight went from frustrating to satisfying. The purification window is genuinely rewarding, and the Daze payoff makes the shield phase feel like a setup rather than a slog.
So, are you ready to stop treating the Miasma shield as an obstacle and start treating it as a trigger? Grab a Rupture Agent, watch your feet during the red-circle attack, and don't forget to heal. That's the formula that worked for me, and I hope it works for you too. 🎮
Comments